|
General usage
Chat basics
Chat moderation / utility
Chat customization
Stream features
|
Settings / Files
About
Issues
Guides
Also check out the official
YouTube Channel
with guides and stuff.
|
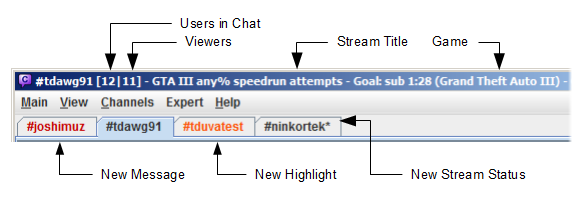
When in a channel, Chatty shows some information about that channel
in the titlebar, e.g.:
[40|59] - GTA:SA Speedruns (Grand Theft Auto: San Andreas)
The first number is the number of people in the chat, the second is the
viewercount, followed by the current stream title and game. Anything other
than the number of people in the chat is requested from the Twitch API about
every two minutes.
In addition, the titlebar will also show additional information, if enabled:
Sub for Subscriber-Only ModeSlow: <time> for SlowmodeR9k for R9Kbeta ModeEmoteOnly for Emote-Only ModeShield if Shield Mode is enabled (moderators only)- A language code if Broadcaster Language Mode is enabled
[FM] indicates a websocket connection (F
for FrankerFaceZ, M for PubSub/Modlogs)
You can toggle showing some information under View - Options - Titlebar.
Note that the stream status (title/game, offline) can take a few minutes
to update, since it has to be requested from the Twitch API (which is
also heavily cached).
A layout is the arrangement of tabs in the Chatty window and popouts,
which can be saved and restored later. Other GUI elements that aren't a
tab (e.g. the Settings Dialog or Emotes Dialog) are not considered a
part of a layout in this sense, so their location and size is determined
in other ways.
You can open several tabs, which can be of basicially two different types:
- Channels and Whisper Tabs, which open as tabs by default.
- Docked Dialogs, which open as a separate dialog by default, but can
be docked as a tab through their context menu (usually right-click).
This includes for example the Channel Info, Admin Panel and more.
Note that these will only be considered as being part of the layout
when in their docked state. When not docked, these dialogs will use
the old system, which is affected by the settings under "Main - Settings - Window - Dialogs Location/Size".
You can use drag&drop on tabs in various ways:
- Move a tab within the same tab pane to change their order.
- Move a tab to another tab pane.
- Drop a tab in the middle of another tab pane to move it to that tab
pane.
- Drop a tab on the side of another tab pane to create a split pane,
containing two tab panes side-by-side.
- Drop a tab outside of any Chatty window to open it in a popout
(depending on the settings under "Main - Settings - Tabs").
You can also open the tab context menu (right-click) to perform various
actions such as opening a popout or closing the tab.
You can save the current tabs, splits and popouts in a layout under
"View - Layouts". Saving a layout is a snapshot of the current state, so
if you make any changes that you wish to be saved, you'll have to save
it again (add a new layout or overwrite an existing one).
If enabled ("Main - Settings - Main") the layout will automatically be
restored when restarting Chatty, which is separate from saving layouts
manually.
Aside from loading layouts through the menu, you can also use commands:
/layouts add <name>- Add a new layout with the current state. If the layout already
exists, you will be asked whether you want to overwrite it. Example:
/layouts add abc
/layouts save <name>- Adds a new layout with the current state or overwrites it if the
layout already exists (without asking).
/layouts remove <name>- Removes the given layout.
/layouts load [-clm] <name>- Loads the given layout.
- If no options are given (e.g.
/layouts load abc) it
will open the load layout dialog.
- Options can be given to define how to load the layout, which also
loads the layout immediately without showing the dialog. The options
are equivalent to what you can select in the dialog:
c to keep the current channels openl to open the channels from the layoutm to load the main window location/size
For example /layouts load -c abc keeps the current channels
open, but does not join the channels in the layout. The options can
also be empty, for example /layouts load - abc will not
open any channels or keep any channels open (but the rest of the
layout such as docked dialogs is still loaded).
- You can use
/layouts load -- -abc if your layout name
begins with a - (in this case "-abc"), which opens the
dialog just as if you hadn't provided any options at all.
Default hotkeys which can't be changed:
The following default hotkeys can be changed in the Settings:
- F1 - Open help
- Ctrl-F - Find text in chat
- Ctrl-L - Open Live Channels window
- Ctrl-J - Open dialog to join channel
- Ctrl-E - Open/close the Emoticon dialog
- Ctrl-Tab/Ctrl-Shift-Tab - Switch to next/previous tab
- Ctrl-W - Leave/close the active channel/close the popout
- Ctrl-Space - Toggle User Selection Mode
- F10 - Toggle Menubar
- Ctrl-F10 - Toggle Inputbar
- Shift-F10 - Toggle Userlist
- F11 - Toggle "Fullscreen"-Mode (actually only removes the menubar and maximizes the window)
In the Settings you can configure hotkeys for many more functions than
are listed here.
This has been moved to it's own page
The login data consists of a username (your account name) and most
importantly an access token, which is sort of a revokable
password that can also have different types of access (scopes) associated with
it. You can see the full list of associated scopes under "Main - Account"
(hover over each entry for more information if available).
If getting login data fails, read this guide.
If your login was determined invalid, read down below.
To change what Chatty is allowed to do, you need to request a new
access token. Go to <Main - Account>,
delete the login and request it again with the access scopes that you
want.
The access token is saved in the login file in the settings
directory and can thus be accessed
by anyone having access to your computer.
It allows anyone who obtains it to chat in your name and do the other things
that you have allowed Chatty to do. If you think the token may have been
compromised, please immediately go to your Twitch Settings subsection
Connections
and revoke the accesss there. This will make all tokens previously
requested for Chatty associated with that account invalid. You can then
request a new one for which Twitch will ask you to authorize Chatty again.
If your login is determined invalid (either by checking it manually or
when Chatty performed an automatic check), this can mean one of two things:
- Your login is actually still valid, Twitch is just derping:
- Sometimes the Twitch API won't recognize any login as valid,
for a while. This is likely the reason if other users have
the same issue at the same time.
- How to proceed:
- In this case, requesting new login data from Twitch probably
won't help at all. Go to
<Main - Account>
to open the Login configuration and click on [Verify login] a few times
(with a few minutes in between attempts).
- If you are already connected to chat, you can just stay
connected. Just try
[Verify login] a bit later to
be able to use the features that require Twitch
authorization again.
- If
[Verify login] keeps returning invalid,
even after a while (especially without other users
having the same issue), your login may actually be
invalid.
- Your login is actually invalid:
- You have just requested login data and something went wrong, or it
wasn't loaded properly from the settings.
- The token was invalidated for some other reason.
- How to proceed:
- Go to
<Main - Account> to open
the login configuration (if you don't already have
it open), click [Remove login]
and create a new login.
What happens when your login is no longer valid:
- You can't connect to chat anymore. If you are already connected, you
probably stay connected though.
- Various features that require authentication may not work anymore,
such as showing live streams you follow or changing your stream
title.
There are various ways of joining channels:
- The "Settings - Main - On start" setting for when Chatty is started
- The "Main - Connect" dialog when connecting
- The "Channels - Join Channel" dialog
- The "Channels - Favorites / History" dialog
- The
/join command
- The "Channels - Live Channels" dialog context menu or (if configured
that way) via double-click or space while a stream is selected
- Right-clicking a Stream Status Notification
- The user context menu
- Loading a Layout
Channel list format
In places where you can enter a channel name you can specify several
channels by separating them with a comma. Channels can be entered with
or without leading #. A lot of Twitch links should also
work.
Various special elements can be added that are turned into channels:
- Can include Addressbook categories,
e.g.
[vip] to join all entries associated with the
"vip" category. Can restrict to just channel entries [vip #]
(would only get Addressbook entries such as "#joshimuz") or
non-channel entries [vip !#] (entries such as "joshimuz").
Note that both channel entries and non-channel entries are otherwise
handled the same, both would join "#joshimuz" in this example.
- Instead of Addressbook categories
[*] can be used for all
favorited channels (favorited under "Channels - Favorites / History").
- Can also restrict to just live channels e.g.
[vip live],
[vip # live] or [* live] (only works for
live channels Chatty already knows the status for, such as followed
channels).
Example: /join #joshimuz, esl_csgo, [mod], https://twitch.tv/esamarathon, [* live]
(joins #joshimuz, #esl_csgo, any entries
associated with the mod Addressbook category, #esamarathon
and any favorited channels that are live and followed)
There are a few special symbols that are used for users in chat. These
are displayed in the userlist and - if usericons are disabled - also in chat:
| ~ |
The Broadcaster |
| @ |
Moderator |
| + |
Turbo/Prime |
| % |
Subscriber |
| $ |
Donated Bits |
| ^ |
Bot (as recognized by local setting, FFZ API and BTTV API) |
| * |
Global Moderator |
| ! |
VIP |
| & |
Staff, Admin |
When you copy&paste a message from chat that contains Badges, you may
also encounter the following symbols:
| ' |
Addon Usericon |
| ? |
Unknown Badge (for example special Twitch Badges that may only
be available for some time or in some channels) |
FrankerFaceZ provides a custom
mod icon for some channels. You can disable this in the settings if you
want to keep the default one for all channels.
The userlist on the side of the channel shows all users currently
considered to be in the channel.
- A user gets added to the userlist..
- ..when the user says something in chat.
- ..when Chatty receives a JOIN from Twitch Chat for that user (or
that user is on the received NAMES list).
- A user gets removed from the userlist..
- ..when Chatty receives a PART from Twitch Chat for that user.
- The userlist gets cleared entirely..
- ..when you close the channel (close the Tab).
- ..when you rejoin the channel (e.g. when reconnecting).
In order to receive JOIN/PART messages, the setting Correct Userlist
under Settings - Advanced - Connection has to be enabled.
Note: The userlist is not very reliable and should only be taken
as a rough estimate of who is currently in the channel. This is because:
- JOIN/PART messages are sent in batches and can be pretty delayed, so
so it may happen that a user who only just started showing up in the
userlist joined half a minute ago (or even already left again).
- It can take some time for Twitch to send the userlist when you join
a channel. In big channels it may not be sent at all.
- MOD/UNMOD messages are unreliable as well, so mod status in the
userlist may not always be correct. Twitch Chat has also been known to
sometimes spam MOD/UNMOD messages.
Also note that the userlist doesn't necessarily have to do with who
watches your stream. A user can be logged into chat without watching the
stream and vice versa. Overall, just don't take the userlist too
seriously.
When typing in the inputbox, you can use the following keys by default
(this can be changed in the Completion settings):
- TAB to complete usernames
- Shift-TAB to complete Emoticons
Once a completion is initiated, TAB and Shift-TAB
cycle forwards and backward through the results, or use the mouse.
Some prefixes always force a certain completion type (whether you use
TAB or Shift-TAB):
- Prefixing
@ completes usernames (e.g. @jo)
- Prefixing
/ completes command names
- Prefixing
: completes Emoji codes, and by default also Twitch Emotes (can be changed in the settings)
- Prefixing
. performs Custom completion
- Certain commands such as
/ban complete usernames for
their first parameter
- Setting commands such as
/set complete setting names
for their first parameter
Additionally, some prefixes will automatically initiate completion (this
too can be changed in the settings).
Further usage
- Use TAB to cycle forward through results and
Shift-TAB to cycle backwards through results
- Continue typing, send the message or move the cursor to end completion
- Click on a result to choose it, or Shift-Click to insert
several results
- Press ESC to go back to before completion
The found matches are all ordered alphabetically, except for nickcompletion
for which you can choose different types of sorting. By default nicknames use
predictive sorting, which means users who recently wrote a message or highlighted
you have a higher priority, increasing the chance that the users you want to
address appear as the first few matches.
Example: Nick Completion
- Enter
z in the editbox
- Press TAB to complete as a nickname (assuming the setting is that)
- On default settings, this may complete to
ze_tt
with two other results
- Cycle through to
zMASKm by:
- Pressing TAB, which cycles fowards to
zMASKm
- Or press Shift-TAB to cycle backwards to
zeblover
and Shift-TAB again to cycle to zMASKm
Example: Emote Completion
- Enter
dat in the editbox
- Press Shift-TAB to complete as an emote (assuming the setting is that)
- On default settings, this may complete to
DatHass with two other results
- Cycle through to
DatSheffy by:
- Pressing TAB, which cycles fowards to
DatSaunce
and TAB again to cycle to DatSheffy
- Or press Shift-TAB to cycle backwards
to
DatSheffy
Chatty provdes an input history for the chat input box that allows you to
call up lines you entered previously, to make it easier to e.g. repeat
commands with similiar parameters, repeat messages you send to chat or just
look up what you wrote before. You can even save messages to the history
that you haven't send yet to be able to send them later.
Note: On a multiline inputbox you have to hold Ctrl
to navigate through the Input History (changeable in Chat Settings).
- How lines are saved in the history:
- Send a message or enter a command
- Press Down-Arrow after entering/editing a message
(which saves it to the history, but also clears the input box)
- Identical lines already in the history are removed (or you
can think of it being moved to the latest position)
- Using the history:
- You can navigate backwards and forwards through the history by
pressing Up-Arrow and Down-Arrow.
- Pressing Up-Arrow when you already entered some
text replaces that with the latest history item.
- Pressing Down-Arrow when you already entered some
text clears the input box and but also saves what you entered to
the history (as mentioned above).
- When you navigated to a history item and edited it:
- Pressing Up-Arrow will move to the previous
history item, allowing you to then press Down-Arrow
again to go back to the unedited history item
- Pressing Down-Arrow will act as if you
entered a completely new line and add the edited item
to the history and clear the input box
This does not apply anymore since Twitch changed their system to use
IRCv3 capabilities. Joining several channels does not have any drawbacks.
If enabled, the history automatically saves channels you join and when
you last joined them. By default channels expire from the history after
30 days of not joining them (can be changed).
You can also add channels from the history or any
you enter manually to the favorites, which will always be kept until you
remove them yourself.
The highlight system allows you to add words or phrases that make chat
messages appear in another color and appear in a separate window, which you can
open under View - Highlights (you can clear the highlights window
in it's context menu).
The ignore system works very similiar to the highlight system, just that
it hides messages instead of highlighting them. They however also get
added to a separated window, which you can open under View - Ignored
(you can clear the messagess in the window in it's context menu).
Right-click on a user in chat to open the User Context Menu, where you
can ignore or unignore that user from the Miscellaneous
submenu. You can view and edit the list of ignored users in the settings.
The color of a user is displayed in the User Info Dialog. Color Names
are used where possible, HTML Color Codes are displayed in the Tooltip.
Colors with asterisk (*) are default colors (the user hasn't set one
or hasn't said anything during this session yet). A color in parentheses
means it's the original color, while the other color is the corrected one
that is actually displayed.
Corrected Colors
Chatty attempts to make colors more readable automatically by changing
them to increase contrast. This doesn't work very well though, although it
should work for extreme cases like white on white or black on black.
Custom Colors
You can also specify custom colors for certain users or types of users
in the settings. Custom colors are indicated by two asterisks (**) in the
User Info Dialog.
Chatty supports the following types of emoticons:
- Twitch Emoticons (Global, Turbo, Subscriber)
- FrankerFaceZ Emoticons
- Global and Channel-specific Emotes
- Feature Friday Emotes
- Featured Emotes (usually available in Speedrunning Marathons)
Note: These emotes require being connected to
the FFZ Socket Server to be updated. There is an issue where
reconnecting to the server sometimes doesn't work. If you
enter the command /ffzws and it is stuck at
Connecting.. for a longer period of time, you
may have to restart Chatty for it to work again.
- BetterTTV Emoticons
- Global and Channel-specific Emotes
Note: BTTV can also contain GIF emotes, some
of which don't work very well in Chatty. (You also have to
opt-in to show them in the settings in the first place.)
- Not supported are Personal Emotes
- Emoji, turns the Unicode Emoji character into an image (you can
enter Emoji either by pasting the character directly, or by entering
a shortcode (e.g.
:thinking:) into the inputbox, which
will be turned into the character when you press Enter to send it.
Tip: You can use TAB Completion
for Emoticon codes (Shift-TAB by default) and Emoji shortcodes.
You can enable/disable Emoticons in general (displaying the images instead
of the text) in the settings under Emoticons. You can also
ignore specific emotes in the same place in the settings.
In chat you can right-click on an emoticon to show some info about it.
Click on the emote code (e.g. FrankerZ) in the context menu
to insert the emote in the inputbox. If it is a subscriber emote, you
also have some more options.
Emote Dialog
Use Extra - Emoticons or press Ctrl-E to open
the Emote Dialog, which has various pages:
- The
Favorites page lists emotes you have added to the favorites
via the Emote Context Menu (right-click on an emote in the dialog or chat and
choose Favorite, emotes that already are favorited can be
removed from favorites the same way).
- The
My Emotes page lists the emotes you paid for (Subemotes/Turbo).
- The
Channel page lists the emotes that are specific to the current channel
(FFZ and BTTV, if there are any). It also includes
the subscriber emotes of the current channel (if it has any), whether you
can use them or not (but it displays a message if you are not subscribed).
- The
Twitch page shows all free global Twitch emotes
- The
Other page shows all global FZZ/BTTV emotes
Click on an emote to insert it into the current channel inputbox. Double-click
on an emote to also close the Emote Dialog in the process, or press ESC or
Ctrl-E to close it. Right-click on an emote to show a context menu
with some more information/options.
Right-click on an emote and choose Show Details to open the
Detail View in the Emote Dialog, which shows the emote in different sizes
and some information about it. Clicking on an emote in chat also opens the
Detail View.
Note that you need to have joined at least one channel for your subemotes/turbo emotes
to show up, because only then does Twitch Chat send that information to the client.
You can add your own local emotes by creating a file called emotes.txt
in the settings directory (enter /dir in Chatty to find the
settings directory, /openDir to directly open it). The
file can have one emote on each line, for example:
D:      aww.png     size:18x18
re:Gr[e|a]yface Kappa.png
# Switching Kappa and MiniK
Kappa   http://static-cdn.jtvnw.net/emoticons/v1/3287/1.0
MiniK   http://static-cdn.jtvnw.net/emoticons/v1/25/1.0     set:793 id:3287
This can be used to replace existing emotes, since custom emotes are
checked first and thus take precedence. This is not intended to replace
FFZ or BTTV emotes, just to help configure emotes to your personal
preference. For example you could also add an image for you own name to
have it highlighted in chat in a different way.
Note: The emotes.txt should be saved in the
UTF-8 encoding (or ASCII I guess).
Syntax
The syntax per line is (you can use as many spaces or TABs as seperators as you want):
[settings] <code> [settings] <image> [settings]
Settings can be in any of the shown places, but are always optional. Available settings are:
set:<setid> to specify a
Twitch emote set. This will only affect messages you write yourself.id:<emoteid> to specify a Twitch emote id to
replace. This will only affect incoming messages.chan:<channel> to restrict the emote to the
given channel.size:<width>x<height> to specify the
size of the emote (you can omit this if you want to use the image
size).
Required:
- The code can be prefixed with
re:
to specify a regular expression. Otherwise it is interpreted as plain text
(the same as regular Twitch emotes, case-sensitive and usually separated
by space from other characters).
- The image file is relative to the settings directory (where you created
the
emotes.txt in), so just put them in the same directory.
You should also be able to use URLs to load the image from the internet.
Lines starting with # are ignored and can be used for comments.
The emotes.txt file is loaded when you start Chatty, so if you edit the file
while Chatty is running, you have to use the /reloadCustomEmotes
command for it to take effect.
Emote images may be cached, so if you change the image, you MAY have to
clear the cache (/clearemotecache CUSTOM).
This has been moved to it's own page
With this feature, you can select a user in chat with keyboard shortcuts
(if the window is active). So you can e.g. timeout a user with your keyboard
alone.
Press Ctrl-Space (can be changed in the settings) to enter
this mode. If there are any user
messages in chat, then the newest message will get another background color
which shows that it is selected. In that mode, the focus is on the textpane,
which enables more shortcuts:
- W to move up a user
- S to move down a user
- A to move up twice
- D to move down twice
- Q to quit out of the mode
- E to open the User Dialog for the currently selected user
When you move up and down, it actually switches to the next user instead
of to the next line. So if the same user send 10 messages in a row, it will
jump to the first message of the next user above it.
In addition to the currently selected message, it will also highlight all
other messages by the same user. You can also hold AltGr and
click on a username in chat to highlight all that users messages (and enter
User Selection Mode).
You can also click and hold in an empty area of the textpane, which puts
and holds the focus there, so you can just use the shortcuts in the list
above to enter the User Selection Mode and switch between messages. However
if you let go of the mouse key, it will immediately leave the mode again.
Using Global Hotkeys
You can also configure global hotkeys with some User Selection actions.
However, if the focus is not on the chat, then the usual shortcuts won't
work, so you'll have to define additional global hotkeys to e.g. timeout the
currently selected user. See the hotkey settings for what actions are
available.
Stream Chat is a separate dialog, opened via the /openStreamChat
command or the Extra menu, which is different from normal chats:
- Can contain messages from one or several channels at once (only regular chat messages, no info messages)
- Messages can be automatically removed after a certain time
Getting started
For chat messages to appear in the Stream Chat, you have to both
enable the channel and join the channel in Chatty normally.
You can enable channels in the Stream Chat context menu (which will
offer to enable currently joined channels) or use the
following setting commands (channel all-lowercase):
/set streamChatChannels #<channel> - To set
the channel to only this one/add streamChatChannels #<channel> - To add
a channel/remove streamChatChannels #<channel> - To remove
a channel
Other settings
/set streamChatLogos <size>- Set the channel logo size (pixels). Set to
0 to disable.
- Logos are only shown for channels that have been live during the
current session. Changes only affect new messages.
/set streamChatMessageTimeout <seconds>- How long messages are displayed before they disappear. Set to
-1 to disable.
/set streamChatBottom <0/1>- Disable so messages start being inserted at the top.
- Restart required to apply changes.
/set streamChatResizable <0/1>- Whether Stream Chat dialog should be resizable.
In addition, make sure you have Settings - Window - Restore dialogs
set to at least Restore dialogs from last session in order
to keep the position/size of the Stream Chat dialog between sessions.
Commands
/openStreamChat - Opens the Stream Chat dialog/setStreamChatSize <width>x<height> - Set the exact size of the Stream Chat dialog in pixels/getStreamChatSize - Shows the size of the Stream Chat dialog in pixels/clearStreamChat - Removes all messages/streamChatTest [message] - Adds a test message to the Stream Chat dialog, if you don't specify a message
a default one is used
You can give people in chat custom names that will appear in chat and
in the userlist instead of the regular Twitch username and in the User Info
Dialog in addition to the regular Twitch username. In other places (like
the User Context Menu) the regular Twitch username is used.
TAB Completion also allows you to complete Custom Names and by default
also includes the original name in the results.
The following commands are used to set custom names:
/setname <username> <custom name> - to set a custom name/resetname <username> - to remove a custom name
In addition to these commands, you can also view and change Custom Names
via the Settings GUI under Names. You can also right-click
on a user in chat to open the User Context Menu and choose
Miscellaneous - Set name to open the Settings with the name
preset.
If enabled in the settings under Main - Settings - Chat you
can stop the chat from scrolling down while you move the mouse over chat.
This can prevent misclicks when the chat is moving. The chat will resume
scrolling down as soon as you stop moving the mouse or move it out of
the chat area. When the chat is already paused, you can also hold
Ctrl to keep the chat paused even without moving the mouse.
Optionally, you can set it to require Ctrl being pressed in
conjunction with moving the mouse to initiate pausing. You can let go of
Ctrl as soon as pausing is started and it will stay paused as
long as you move the mouse inside the chat area.
A little popup in the top-right will indicate that the chat is paused.
Please note: This only works when the chat area is already filled, so the scrollbar is
actually used. In addition, there may be instances where something you
want to click will move anyway, for example if a message is deleted due
to a timeout/ban, causing other messages to move.
Scroll up to stop scrolling
Another way of preventing scrolling down is scrolling up. Once you are
manually scrolled up, chat will stop scrolling down automatically.
However messages may still be removed from the buffer causing the chat
to move despite it not actively scrolling down. It will stop removing
messages to get moving to a minimum as long as you keep holding
Ctrl.
A certain time after not moving the scroll position, it will scroll down
automatically (unless Ctrl is still being pressed).
One-click moderation
Holding Ctrl and clicking on a user in chat can execute a ban
or timeout on that user. Enable this feature and define what it does in
the settings (Main - Settings - Chat).
It is recommended to enable the pause chat feature if you are using this,
or else misclicks could be very common.
AutoMod
is a Twitch feature that filters messages before they are send to the
chat clients. As mod in the channel you can review and either approve
or deny those filtered messages in different ways:
- The AutoMod Dialog under
Extra - AutoMod
- Enable
Settings - Moderation - Show messages rejected by AutoMod
to show rejected messages directly in chat and..
- Right-click on the username of a filtered message and
approve/reject from the context menu
- Click on the username of a filtered message to open the User
Info Dialog and click the approve/reject button
(settings)
AutoMod Dialog
In the dialog you will see filtered messages of the current channel (if
you are mod). Open the context menu on a message (usually right-click)
to approve or deny that message. Double-click on a message to open the
User Info Dialog for that user to be able to see his previous messages
or ban/timeout the user.
Shortcuts available when you have a message selected:
- A to approve, D to deny message
- W to move up in the list, Alt+W to jump over
already handled messages
- S to move down in the list, Alt+S to jump over
already handled messages
Messages can have different prefixes depending on their status:
- No prefix - The message has not been approved/denied yet
Approved - You have approved the messageDenied - You have denied the messageHandled - The message has been handled already,
probably by another mod (the API does not return whether it's been
approved or denied)Pending - Your action is being sent to the Twitch APIN/A - The message is no longer available to be
approved or denied (this seems to be the case after a few minutes)Error - An error occured sending your action to the
Twitch API
Messages that have already been handled or that are older than 5 minutes
(and can thus probably not be approved/denied anymore) are
shown greyed out.
The Channel Info Dialog shows the current stream status of the active
stream. The data is requested from the Twitch API in a semi-regular interval,
so it can take some time to update.
Stream Uptime
If the stream is online, the Live: 1h 30m
shows how long ago the stream was started. That time comes directly from the
Twitch API, so it is able to show the correct online time, even if you started
Chatty after the stream started.
If there is a time in parentheses
(like 1h 30m (2h)), then that time denotes how long the stream
was online, but including small offline periods (PICNICs) of at most 10 minutes,
which means that this time is more of a guess of what might be expected as
stream online time and also depends on when Chatty got the data (if you join
the channel after a PICNIC, then it won't include the time before, because it
never received the data for it).
History Graph
The History is a graph that shows the development of the viewers
of the currently active channel and also indicates stream status changes
(online/offline/title/game) by different colors.
Hover over points to display the stream status and viewercount
at that time. Right-click for a context-menu.
|
There are two ways to change which time range is being displayed:
- Time Range means only the last x hours
are being displayed. For example if the whole data spans 10 hours
you can choose to only display the last 2 hours. This will display
the maximum range after the actual range
(even if the actual range isn't as long as the
maximum range):
15:32 - 19:14 (2h)
You can change this via the context menu.
- Fixed Start/End means that either
the beginning of the displayed data is fixed or both the
beginning and end of the data are fixed, meaning that the
displayed graph will never change. The times that show the
actual range indicate whether they are fixed:
|15:58| - 19:14 or |15:58| - |18:20|
Double-click on a point to set it as a fixed start, then
double-click on another point to set it as a fixed end.
Double-click anywhere else to clear fixed start/end.
This setting is channel-specific and isn't saved when you
close Chatty.
|
|
The History is recorded while you have the channel open in Chatty
as well as for all followed channels, if you have that feature
enabled.
The shown data usually fits to the available vertical space
(so if the min/max viewercounts were 341/403 then only this
range is shown). If you choose Toggle Vertical in
the context-menu, you can switch between the shown range
(min/max) and the full range (0-max).
Chatty can show Notifications when the status of a stream changes.
There is also a Live Streams window (Channels - Live Channels)
that shows the currently live streams. Both these features always include channels you have
joined and - if enabled - channels you have followed. Streams that are
no longer online, or whose channels you have left and you don't follow,
are added to a list that you can open in the Live Streams window context
menu (Removed streams..).
Notifications
Chatty Notifications are little info boxes that can be shown for stream
status changes and highlighted messages. When you left-click on a notification
it is closed immediately, right-clicking closes it as well and in addition
also joins the associated channel.
Chatty can request a list of streams you follow on a regular basis, so
you have both an overview of currently live streams as well as be
informed about status changes (offline -> online, title change, game change).
This is always available for streams whose channels you have joined in chat,
but with this feature enabled, this works for all streams you follow even
without joining their channel.
This feature requires Show followed streams access, so Chatty can
request your followed streams. Read the section about login
to learn more about login data and access.
You can enable/disable this feature in the Settings under Notifications.
This has been moved to it's own page
You can open a list of the Followers of a channel by joining that channel
and then opening the Followers Dialog via Extra - Followers.
It always opens on the currently active channel, or if you are in no channel
at all, your own channel.
You can open a list of your Subscribers by opening the Subscribers Dialog
via Extra - Subscribers. It always opens on your own channel,
because you can only display the Subscribers of your own channel. If you don't
have any Subscribers, it will simply show an empty list (and an error). You
also need to have selected the necessary access when
requesting login data.
You can save the current list to a file by right-clicking on the dialog
(not the list) and selecting the format.
Usage
Both the Followers and Subscribers Dialog otherwise work in pretty much
the same way. Data is only requested as long as you have the dialog open. It
is requested in a semi-regular interval and then displays that data in the
list (and some stats).
If followers/following is mentioned below, then the same applies for
subscribers/subscribing in the appropriate dialog.
|
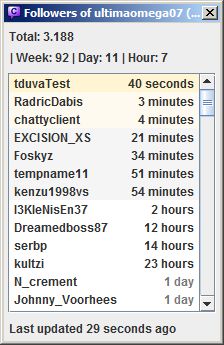
At the top it shows some stats:
- Total: The total number of followers (not to be confused
with the followers shown in the list, which are the most recent 100).
After the total number, it shows the change compared
to the last update, e.g.
Total: 3.190 (+2),
which will stay there until the next update.
- Week/Day/Hour: These are some stats based
on the current list shown below. It shows how many followers
there are in the list that followed in the last 7 days (Week), 24 hours (Day) and
60 minutes (Hour). (So Day does NOT mean Today
as in since 0:00.)
If it says 99+ it means that there are more than
99 followers in that timespan, but Chatty can't determine whether
it's 100 or more than 100, because the list only contains the
100 most recent followers.
There are different background colors for some entries:
- New entries (meaning entries
that appeared first in the last update)
- Entries of the last 15 minutes
- Entries of the last hour
The time has different colors for older entries:
- Entries older than a day
- Entries older than a week
At the bottom, it shows approximately how long ago data was last received,
or a short error message if an error occured.
|
 |
About New Followers/Refollows
Everything that determines whether a follower is new or a refollow is
saved per session. So if you restart Chatty, it assumes that all followers
except from the first request are new. So if you start Chatty, open the
Followers Dialog on your channel, it will load the followers for the first
time and show none of them as new. Now if it updates a minute later, and there
are users it hasn't seen as having followed before, then it assumes these
users as new followers.
Now a user of course might have been a follower for a year, then unfollow
and follow again. Chances are that Chatty won't notice that and assume a new
follower. What it however does is that it only shows each user as new follower
once per session. So if someone follows and Chatty shows that user as a new follower,
then that user unfollows and follows again, Chatty will notice that the first
and the second follow time are different, and will show this user as a refollow
(the name slightly grey).
So this basicially just prevents the same user from e.g. making a sound
go off (if you have that enabled) several times just by refollowing several
times. At most that will happen once per session. Other than that
the data is mostly shown just as it comes in from Twitch. It will still
show refollows on the top of the list.
Chatty can help you with creating Highlights of your stream by recording
the stream time (how long the stream has been online) using a command or
hotkey. When you add a Stream Highlight in Chatty, it is written to a file
which you can then view later.
The following commands are available:
/addStreamHighlight [comment] - Adds a highlight at
the current time, with a comment if you want to./openStreamHighlights - Opens the file where the stream
highlights are stored in your default text editor.
You can also add a hotkey to add stream highlights, so you can also do it
yourself while streaming out of a game (given that global hotkeys work in
the game).
The highlights are written to the file stream_highlights.txt
in the exported subfolder of the settings directory (which
you can open with the /openDir and show with the
/dir command).
Chat Command
You can also let users in chat (e.g. Mods/VIPs) add Stream Highlights
(!highlight [comment]), which you can configure under
Main - Settings - Stream Highlights.
Stream Markers
Twitch offers a way to add
Stream Markers
which show up when creating Highlights on the website. You can use the
/marker command or add a Stream Marker automatically when
adding a Stream Highlight (changeable in the Stream Highlights settings).
For creating Stream Markers you need the Edit broadcast
scope, so if you don't have that yet, you have to
request a new login token.
Both the ignore joins/parts and Twitch Client Version 3 option have
been removed. You can now disable the Correct Userlist
setting to not get any joins/parts if you think it could improve performance.
Using the /proc command you can start processes directly out
of Chatty. An example of where this is already integrated into Chatty is
starting Streamlink, however this is a more basic implementation.
You should only use this if you know what you are doing, running
system processes can be dangerous if done wrong. Take special care when
unsafe/unpredictable text is being used, for example from chat messages,
which may need to be properly quoted/escaped depending on context.
/proc exec <command and parameters> - Try to
start a process on your computer. The command and parameters are
split by spaces, unless enclosed by quotes.
A quote can be escaped by adding a backslash in front \"
(note that if there is no closing quote, the last quote, even if
escaped, is used as closing quote). Adding another backslash, e.g.
\\" will still escape the quote. The debug log shows
both the original command text and how it was split up./proc execEcho <command and parameters> - Same as
above, but prints the output of the process to the current tab./proc list - List of processes currently running out of
Chatty./proc kill <id> - Forcefully end the process with
the given id (get the id from the list of processes).
Example: /proc exec notepad H:\hl.txt will start Notepad
and open the given file.
Note: Commands and output of the process is logged in the Debug Log which
is written to file and output to Extra - Debug window.
There are a few options you can launch Chatty with, that will override
settings loaded from the settings file or change how Chatty is started. You
need to run Chatty from the commandline or
Create a shortcut to use
these. If you're using the Standalone version you can also specify launch
options in the Chatty.cfg.
-server <host/ip>- Specify a different server to connect to
-port <port>- Specify a different port to use for connecting
-user <username>- Your username
-password [password]- Login with password instead of access token, optionally
also the actual password to use. Twitch doesn't allow
password login anymore.
-token [token]- Login with the given token.
- The username currently saved in Chatty must match the account
associated with the given token. If no login data is currently
saved in Chatty or the username is different, you have to use
-user to set the correct username.
-connect- Connect immediately when starting Chatty
-channel <channel>- The channel to join (you can specify more than one channel by
separating them with a comma)
-ds- Don't save settings automatically (they can still be saved manually
via "Main - Save..")
-cd- Use current working directory as settings directory.
This can be useful to make Chatty more portable or use several
different setting files on the same computer.
More information..
-d <dir>- Same as
-cd, except that you directly specify the
settings directory to use. The specified directory has to already
exist (even if you just created an empty directory for it).
-portable- Creates a directory called "portable_settings" next to where the
"Chatty.jar" is located and uses that as settings directory.
-debugdir <dir>- Specify the debug log directory. The specified directory has to
already exist, same as with
-d.
-set:<settingName> <setting value>- Change any setting that can be edited via the
/set
command (see Setting Commands).
-single [port]- Run in single instance mode, which means if you start Chatty while
it's already running the parameters are forwarded to the already
running instance instead of starting another one. You have to
specify the
-single parameter with the same port (or
no port to use the default one) for all instances that you want to
have run in the same single instance mode.
- The port is listened to locally to check if any instance is already
running and to forward the commandline parameters. If you don't
supply a port a default one is used. If the used port is already
taken by another program you have to specify one that works or else
no instance of Chatty will be able to start.
- Currently only the
-channel and -cc
parameters are forwarded to an already running instance.
-cc <name> [parameters]- Execute the Custom Command with the given name on start. The
parameters are optional. When used in combination with
-single, the command will be executed on the already
running instance.
If you are reporting an issue, please read the page on Reporting Issues.
If you are referring to a specific version of Chatty, please provide the
actual version number, which you can find on the top of the main help page in Chatty
(this one if you are reading this in Chatty, otherwise go to Chatty and open
Help - About/Help or press F1). You can also use the
/appinfo command.