This guide will help you with installing Chatty and getting familiar with some of it's features.
From the Chatty Website you can download either a .zip-Archive which you need to extract or an Installer which will guide you through the installation.
How you start Chatty depends on the version you downloaded and your OS,
but usually you'd double-click on either the Chatty.jar or
Chatty.exe. (See the help
if Chatty won't start.)
If you want to update from an already installed older version of Chatty then you may be able to simply use the built-in update function which downloads the most recent installer and guides you through the update process. If you update manually, then simply extract the .zip or install the Installer into the same folder Chatty is already in and overwrite the old files.
Whether you install Chatty into the same folder or not, your settings are by default stored separately and should stay the same when you upgrade to a new version.
When you start a new version for the first time it will open the Release Information, which may contain information about changes that could require your attention.
Note: If you downgrade to an older version of Chatty, some settings (that the older version didn't have yet) may be lost.
If you are starting Chatty for the first time, you will have to request login data from Twitch so Chatty can connect to chat on your behalf (among other things).
In the Connect-dialog, click on Configure Account
and then Request login data and simply follow the instructions.
Once you successfully created the login, close the dialog until you get back
to the Connect-dialog. (There is a Guide on what to do
when getting login data fails.)
In the Connect-dialog enter the name of the channel you want
to join in the Channel: input box. The name of the channel
is the same as the name of the stream. You can enter more than one channel
name to join by seperating them with a comma. To connect simply press Enter
or click on Connect. After connecting, it will automatically join
the channels you specified.
Even after connecting you can join additional channels via Channels - Join Channel
or entering the command /join <channelname> in the inputbox
(e.g. /join joshimuz).
You can leave channels by right-clicking anywhere in the channel and
selecting Close Channel from the context menu or right-clicking
on the channel's tab (only available if there is more than one channel) and
selecting Close from the context menu.
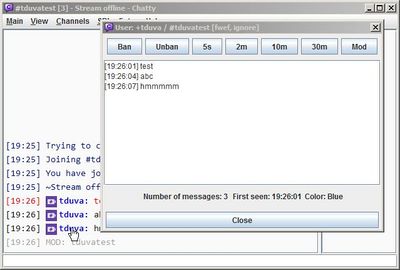
/ban, /timeout, /subscribers
(Hint: Use TAB-Completion).Also check out the options to pause chat and timing out users via shortcuts only.
Chatty regulary requests information about the current stream, which is
displayed in the titlebar and the Channel Info-dialog.
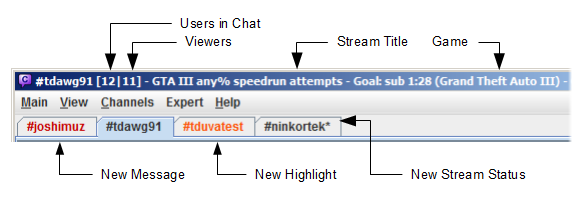
You can open the Channel Info via the View-menu
or the channel context menu (right-click anywhere on the channel). The
Channel Info contains the current title/game but also a history
of the Viewercount and previous title/games (if you hover over points).
Open the Live Channels-window via Channels - Live Channels
to open up a list of streams you follow that are currently live or streams
whose channel you have currently joined that are currently live.
(You need to have the required access with your login data to see streams you follow.)
You can enable/disable showing streams you follow in the Settings - Notifications.
There you can also configure what kind of Tray Notification you want to have
pop up for stream status changes or highlighted messages.
To join channels directly out of the Live Channels-dialog
right-click on a stream to open the context menu and then select Join channel
to join the channel for that stream and if you want also open the stream in
your browser or Streamlink.
Settings
from the Main-menu to get all kinds of settings to adjust
Chatty to your preference. Please make use of the Help link
in the bottom left corner of the Settings-dialog to get
help on the current page of settings you have selected.